*Important note: Purchase a replacement battery from BarnTools to ensure that you are putting in the correct type of battery in your gateway
Step 1: Turn off the Gateway and unplug it
Step 2: Remove the face plate of the Gateway by removing the 6 phillips head screws on the face of the Gateway. You should now see the circuit board of the Gateway.
Step 3: Locate the battery in the top-center portion of the Gateway and remove the battery. Push the battery towards the negative end of the battery (side with spring).

Step 4: Insert the new battery
Ensure the negative end of the battery is on the spring side of the holder.
The battery has a positive end with a "+" and negative end with a "-". The positive side will have a button on it as shown on the right side of the battery pictured below.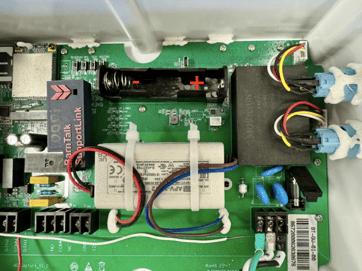
Step 5: Screw the face plate back on the Gateway and Power it On.
Done!
See this article for information about the Gateway's backup battery.
If you have any issues or feedback, reach out to our support team via email at support@barntools.com. call/text 515-272-5122, or call Toll Free at 855-580-0058 during the hours of 8am-5pm CST Monday through Friday